|
The GALEP-5 device programmer series can be used as a hardware interface for OpenOCD. The OpenOCD project is a free software project for accessing microcontrollers (MCUs) via JTAG interface. This way software can be debugged on the original MCU and on the original board. Hardware and software breakpoints can be triggered, the program can be interrupted and executed in single step mode... without emulator and - except for GALEP - without any additional hardware. The JTAG interfaces can be used for -
GALEP-5 is especially well suited as an interface for OpenOCD due to its on-board ARM Linux system. The OpenOCD software runs natively on GALEP-5 and offers a gdb debugging interface via Ethernet or emulated USB port. This allows easy configuration and effective development.
GALEP-5 offers several other features that improve JTAG debugging. Its Ethernet interface ensures fast data transfer. Its front side button can be used for starting OpenOCD functions. The JTAG signals can be assigned to arbitrary pins of the programmer socket. This feature is only offered by the GALEP-5 series.
The following part of the documentation is for developers who want to use OpenOCD for debugging their target system.
For using GALEP-5 as interface for OpenOCD debugging, you can just install a pre-compiled OpenOCD version. It's a snapshot of the OpenOCD project at the time of writing this documentation. OpenOCD is permanently improved, so it could make sense to patch and compile the latest OpenOCD version yourself. This is decribed in Part II of this document.
The OpenOCD archive on http://www.conitec.net/down/g5ocd.zip contains:
|
doc/g5ocd_e.htm
|
This document in html format.
|
| g5ocd-bin-svn-xyzM.tar.bz2 |
The GALEP-5 OCD port, pre-compiled in a Linux archive. |
| g5ocd-bin-svn-xyzM.tar.zip |
The GALEP-5 OCD port, pre-compiled in a Windows™ archive. |
| g5ocd-svn-xyzM.patch.bz2 |
GALEP patch for OpenOCD (for compiling OpenOCD yourself). |
| g5API-abcM.tar.bz2 |
The GALEP-5 API for developers. |
The “xyz” resp. “abc” represent the version numbers.
This software package lets you combine a fast hardware interface (the GALEP-5 device programmer) with an Open Source software (OpenOCD) for debugging MCUs and programming many Flash device types. The GALEP-5 / OpenOCD combination offers the same convenience as high-priced JTAG debuggers. It has already proven itself by inhouse debugging ARM9TDMI and ARM9-EJIS cores (at the moment of writing this document the EJIS core support was not yet fully developed).
Just like OpenOCD, the GALEP-5 port is an Open Source project with no warranty of functions and stability. We will continue developing the software further, but also give you all sources - the full GALEP-5 API - for improving and extending the software yourself.
A configuration file is required for configuring the JTAG debugger with your target system. This is a simple text file with configuration data for the OpenOCD program and the GALEP port. As mentioned, OpenOCD runs natively on the programmer. For this it has to be transferred first to GALEP together with the configuration file. It is transferred with a FTP client and started with a Telnet client.
The configuration file contains settings for the interface, the target system, and for OpenOCD. Example:
# Example that uses the galep5 hardware as ocd interface.
# The socket is configured to interface the arm&eva hardware.
# (See http://www.conitec.com/english/linuxboard.htm)

# interface
interface galep5
interface_speed 0
jtag_speed 100
logic_level 1800
socket_assign TargetDetect 24
socket_assign GND          26
socket_assign GND          27
socket_assign GND          28
socket_assign GND          29
socket_assign GND          30
socket_assign GND          31
socket_assign GND          32
socket_assign GND          33
socket_assign GND          34
socket_assign NTRST        23
socket_assign TDI          22
socket_assign TMS          21
socket_assign TCK          20
socket_assign TDO          18
socket_assign NRESET       17

# daemon configuration
telnet_port 4444
gdb_port 3333

# use combined on interfaces or targets that can’t set TRST/SRST separately
reset_config trst_and_srst

# jtag scan chain
#format L IRC IRCM IDCODE (Length, IR Capture, IR Capture Mask, IDCODE)
jtag_device 4 0x1 0xf 0xe

# target configuration
daemon_startup reset
# target <type> <endianess> <reset mode>
target arm9tdmi little reset_run 0 arm920t
working_area 0 0x200000 0x4000 backup
run_and_halt_time 0 5000

# flash bank <driver> <base> <size> <chip_width> <bus_width> [driver_options ...]
flash bank cfi 0x10000000 0x800000 2 2 0
The interface settings contain GALEP and socket specific data - see example above.
Interface type
The settings begin with the interface = galep5 statement that determines the use of the GALEP-5 / OpenOCD port. This port supports the whole GALEP-5 series (GALEP-5M, GALEP-5D and GALEP-5P).
Speed
Next the number of delay cycles are given: interface_speed = 0 and jtag_speed = 100. The higher the value, the more wait cycles are inserted between JTAG activities (one wait cycle = 1 / 60MHz). As long as no problems with JTAG data transfer occur, no wait cycles are required.
Logic level
The
logic_level = 1800 statement determines the logical high levels of the JTAG signals between 1200 and 4500 mV. !! Check the MCU data sheet for the required signal levels. Wrong values can destroy your target system!
Socket pins
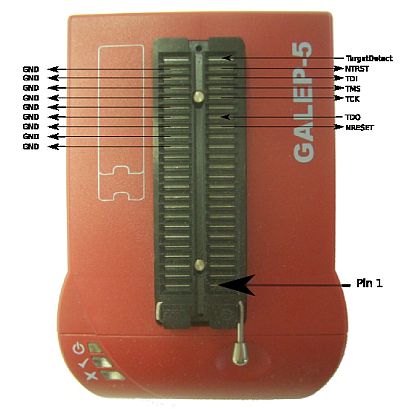
GALEP-5 allows for free assignment of JTAG signals to socket pins. Assignment start with the keywort socket_assign and expects a signal name and a pin number. The signal names and their meaning can be found in the following table:
a Can be assigned to several pins.
b Value depends on vcc_level VCCx = mV.
c Parameter (range) depends on logic_level = mV.
The JTAG relevant signals must be only specified once. GND and VCC however can be specified several times for different pins. The following image displayes the socket pins of the example:
|
GALEP-5 can generate three different voltages - VCC1..VCC3 - on any pin of the socket. All voltages can be adjusted in the 1.2V - 25V range. !! The current per voltage must not exceed 250mA, and the power must not exceed 1.2W! When using the GALEP-5 pocket programmer, please connect the external power adapter when using the adjustable voltages.
In the config file you can set up the voltages this way:
# interface

# ...

vcc_level VCC1 3300
vcc_level VCC2 4500
vcc_level VCC3 5000

socket_assign VCC1        1
socket_assign VCC2        2
socket_assign VCC3        3

# ...
In this configuration, socket pin 1 is set to 3.3V, pin 2 is set to 4,5V and pin 3 is set to 5V. The voltages are switched on immediately after start of the program, and are switched off at terminating OpenOCD.
TheTargetDetect signal is an input line that can be pulled to logical high by the target system (f.i. the supply voltage of the target system). If the signal is assigned to a socket pin (f.i. through socket_assign TargetDetect = 24), the software checks at startup whether the target system delivers a logical high on that pin, and otherwise aborts with an error message. If the signal is not given in the config file, the test is skipped.
GALEP-5D has a button on the front panel. This button can be used to trigger up to three functions with OpenOCD. A function is an OpenOCD script that can contains the same commands that are also available on the Telnet console.
The functions are triggered by pressing the the button for a certain time. The LED below the button indicates the function. By releasing the button the function is started.
|
Button hit
|
LED
|
Button release
|
short |
Doesn't blink |
Function 1 |
long |
Blinks twice |
Function 2 |
very long |
Blinks 3x |
Function 3 |
The functions are determined through button_assign statements. Example:
# interface
# ...
button_assign 1        btShort.script
button_assign 3        btLong.script

# ...
The scripts btLong.script und btShort.script are files containing commands. The console from which OpenOCD was started, and the first Telnet connection (if any) to OpenOCD is used for the command output.
All further statements in the config file are OpenOCD settings. Please refer to the OpenOCD documentation for details.
As mentioned, OpenOCD runs on the programmer and thus has to be transferred before, together with the config file. For this you can use any FTP client. After the following steps you can start with debugging:
You can either order a socket connection cable from Conitec (OCD-JTAG-Cable20, part no. 095540) or put it together yourself. The wiring corresponds to a standard ARM9 JTAG connector as used by other JTAG debuggers. Because the assignment between socket pins and JTAG signals can be freely configured, you can use any other cable as well.
When GALEP-5 is started, but neither OpenOCD is running nor a connection to the PC Galep software is established, all pins of the socket have high resitance. In this state you can connect the unpowered target system with GALEP-5. !! The target system must not be connected to a power supply when connecting it with GALEP. Also, GALEP must not be connected with the Galep PC software!
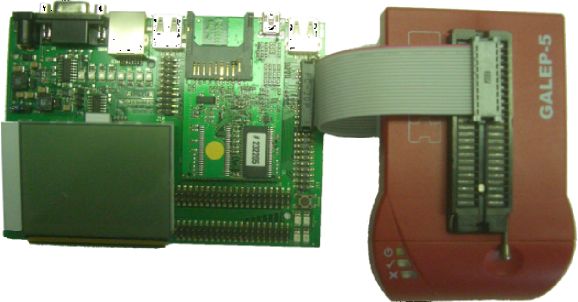
After connecting, the target system can be switched on. If the GALEP socket is used as a power supply, the target is switched on by starting the OpenOCD Software. The following figure illustrates the connection between GALEP-5 and the ARM & EVA Linux board.
|
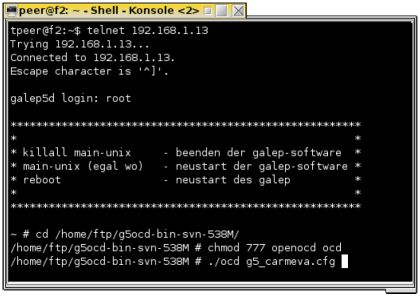
On GALEP-5 a Telnet server is running. Only the user “root” is valid. A password is not required.
|
After logging in, GALEP expects commands via Telnet. All programs that were transferred via FTP can be found in the GALEP directory "/home/ftp". In the image above the following commands were already entered:
cd /home/ftp
chmod 777 ocd openocd
./ocd g5_carmeva.cfg
The last command starts the OpenOCD software. It can be terminated with [Ctrl+C] and anytime started again. If the target system is found, a message like the following appears:
./ocd g5_carmeva.cfg
|
The OpenOCD software opens two network ports:
This port is defined in the config file, in the example above through the statement telnet_port = 4444. This port number must be given when connecting with a Telnet client. Via Telnet, debugging commands can be directly sent the the OpenOCD software, for instance:
The output by OpenOCD scripts assigned to the GALEP-5D button (see above) are also sent to the Telnet port. For detailed information please refer to the OpenOCD documentation.
This port is also defined in the config file, for instance through gdb_port = 3333. The gdb (Gnu Debugger) port is used by the gdb software for source level debugging.
The debugger (“gdb”) runs on the target system. It has to be compiled for the target processor and is normally part of the tool chain for a certain target system. When debugging an ARM based target you'll need a gdb comüiled with ARM support. The gdb source code is freely available, thus anyone can compile the debugger for any target. It runs on many platforms and can also be downloaded as a pre-compiled executable.
There are many frontend for easier debugging. Some scenarios are described below.
The gdb shell frontend is text based and looks puristic at a first glance. Nevertheless it's often the most practical way of debugging. The graphical frontends sometimes fail, especially with JTAG debugging.
Take your time to make yourself familiar with the debugger! It is a very powerful and well-working tool.
Start your target system. Depending on what you're debugging, several steps might be required. Examples:
(gdb) target remote 192.168.1.13:3333
After the connection is established, gdb commands such as “continue”, “ss”, “ni” or “break” can be sent for controlling the program. Please have a look at the really good gdb command reference on http://www.cs.dal.ca/studentservices/refcards/gdbref.pdf.
You have the choice between several frontends for gdb:
All those development systems support the gdb debugger. A detailed description would be outside the scope of this document, but can be found on the Internet.
Conitec has published all libraries required for controlling GALEP-5 under the GPL. The source development kit is contained in the g5api-abcM.tar.bz2 archive. The archive contains the source code as well as the compiled library that direction runs on GALEP-5.
This chapter is for developers that are familiar with Linux and tools such as cross compilers, make, subversion, etc.
For compiling OpenOCD for GALEP-5, you'll need:
A cross toolchain consist of a cross compiler and linker for the ARM9 platform. You can use our Arm&Eva Linux Board toolchain that is precompiled for Linux (32bit) and available from:
http://armeva.conitec.net/i686/tar_bz2/carmeva-dev-cc-3.4.1-glibc-2.3.3-bin-1.1-9_i386.tar.bz2
You'll find them under http://www.conitec.net/down/g5ocd.zip.
The OpenOCD project offers a Subversion repository where you can get the current sources (links see below).
At first preperare the source files.
g5ocd
   |-- g5API
   |   |-- hdw
   |   |   ‘-- openocd.bin
   |   |-- include
   |   |   |-- ...
   |   |-- lib
   |   |   ‘-- libg5api.so
   |   |-- src
   |   |   |-- ...
   ‘-- openocd
       |-- doc
           |-- ...
       |-- ecosflash
           |-- ...
       |-- testing
           |-- ...
       |-- src
           |-- ...
       |-- g5ocd-svn-538M.patch.bz2
|
cd g5ocd/openocd
bzip2 -dc g5ocd-svn-xyz.patch.bz2 |patch -p0
|
./bootstrap
./configure --enable-galep5
|
OpenOCD has to be cross-compiled for ARM9:
# We use this for cross compiling...
PREFIX=/usr/local/carmeva/bin/compiler/gcc-3.4.1-glibc-2.3.3/∖
        arm-9tdmi-linux-gnu/bin/arm-9tdmi-linux-gnu-
export PREFIX

# Build the stuff...
make CC=${PREFIX}gcc CPP=${PREFIX}gcc CXX=${PREFIX}gcc

# Strip the result...
${PREFIX}strip src/openocd
|
After compiling you'll find the binary “openocd” in the “src” directory.
A complete description of all OpenOCD features is outside the scope of this document. Here some links:
OpenOCD home page - here you'll find the complete documentation of the OpenOCD project: http://openocd.berlios.de/web/
OpenOCD mailing list - a quite active mailing list through which the OpenOCD developers answer relevant questions.
Informations about the GNU debugger (gdb) - you'll find a command reference on http://www.cs.dal.ca/studentservices/refcards/gdbref.pdf and the documentation on http://sourceware.org/gdb/documentation.